Welcome to our guide for ‘basic patterns for stretch fabrics'.
You've likely noticed that traditional sewing patterns don't perform effectively when used on stretch fabrics.
You may have possibly ruined a few in the process.
The specificity of these fabrics demands a different approach, as their elasticity affects the fit and aesthetic of the final product.
In this article, we will explore how you can modify your basic patterns, designed for regular fabrics, to perfectly fit the stretch fabrics you're using.


In the case of stretch fabrics, the usual seam allowances applied to patterns for regular fabrics are not necessary.
The flexibility of these materials compensates for the need for additional margin.
Necessary adjustments include reducing the pattern's dimensions, either in width or length, as well as modifying or eliminating darts, which become unnecessary.
However, small darts may still be necessary in fabrics with limited elasticity.
Every creator should have a collection of patterns specifically designed for stretch fabrics.
The necessary adjustment of pattern dimensions depends on how elastic the material is.
The coefficients mentioned in the following examples suggest a reduction in pattern dimensions suitable for fabrics with moderate elasticity.
These coefficients should be doubled for highly elastic fabrics.
Additionally, it's important to consider how snug the garment should be to fit properly.
The only reliable method to ensure proper fabric fit is to create a prototype of the garment using a cheaper material.
The following patterns are adaptations of basic designs for conventional fabrics, such as skirt, blouse, sleeve, and trousers.
These patterns serve as the initial foundation for creating any type of stretch garment.
Once you adjust these basic patterns to make them tighter, they will be ready for use with stretch fabrics with the same ease as you would use a traditional fabric.
To simplify the process, we will use the basic skirt pattern from our website. In this pattern, we use size 46 from the Greek industrial standards.
(Measurements are in centimeters. Convert centimeters to inches here.)
What we will use as a measurement is the seam allowances we have left on the hip circumference in that example, which are:
100/4 = 25, 25 + 1 = 26 cm, which corresponds to 1/4 of the skirt.
That means the seam allowance we left on the hips is equal to 4 centimeters. Now we will divide by 4 and narrow our pattern by 1 centimeter when working with moderate stretch fabrics.
Refer to the diagram for analysis.
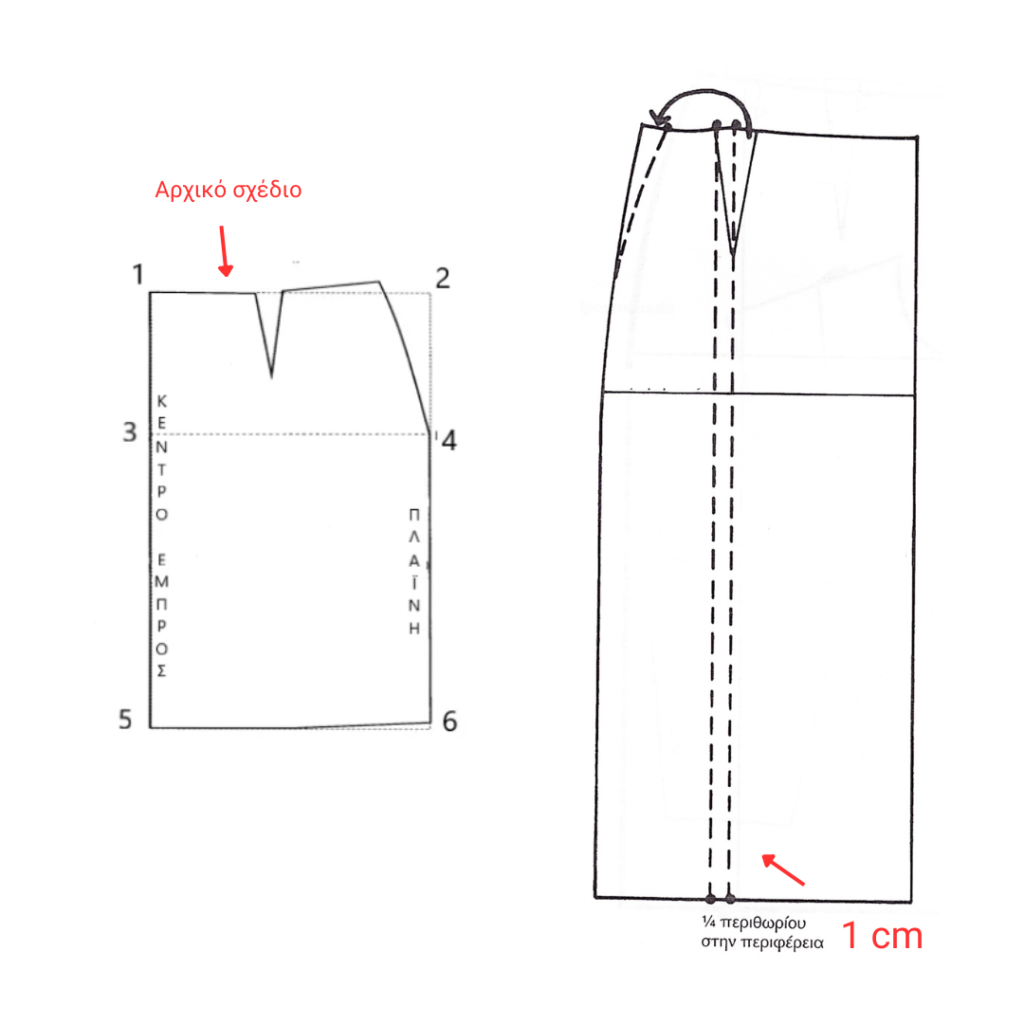
Begin by sketching the basic skirt pattern as you know it, with faint lines for the waist and darts.
As we mentioned before, the seam allowances we left on the hips were 4 centimeters, and according to the rule, we should divide them by four, which gives us 1 centimeter.


Draw the outline of the blouse pattern, up to the waistline, including the bust line, all darts with smooth lines, and the points where the armhole meets.
Start with the front part of the pattern, which requires more adjustments due to the bust area, compared to the back part.
Your pattern should now look like the photo below.

As in the image below.

Place the front and back patterns parallel on the table and create some joining points, as shown in the photo.

The front and back sections of the bodice will undergo the same modifications now.
To narrow the entire piece: mark 0.5 cm on the shoulders (front and back piece), 2 cm along the bust line, and connect them down to the waist, then fold the paper.
The dart on the back shoulder can be removed. For narrowing the neckline and armhole, mark 0.3 cm on the neckline and 0.5 cm on the armhole, connect the points, and fold.
Narrow the side seams (front and back) by 0.5 centimeters.
See below the completed pattern.

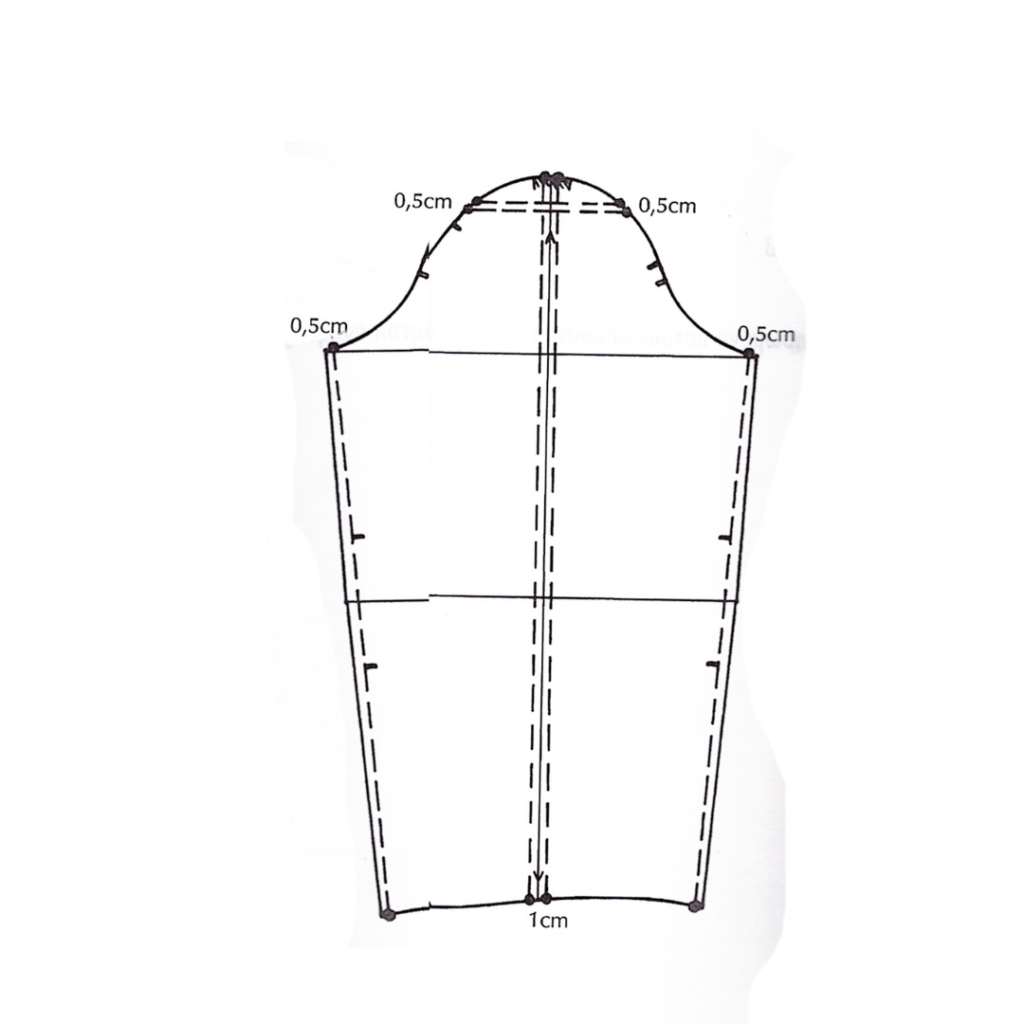
Design the sleeve pattern from the basic patterns.
Adjust the sleeve head by horizontally cutting a strip of 0.5 centimeters in width to perfectly match the reshaped armhole. This removal should be done at the same height as the alterations made to the armhole.
Narrow the seams by 0.5 centimeters starting from the wrist and tapering as you go up.
For set-in sleeves, no additional width is required at the sleeve head. Remove a strip of 1 centimeter width vertically from the center of the sleeve and redraw the center line.
Design the basic pattern for trousers, including the lines for the waist, crotch, knees, as well as the center line indicating the fabric grain, and the waist darts with faint lines.
Draw two parallel lines with a distance of 1 centimeter apart along the fabric grain. 0.5 centimeters to the left and 0.5 centimeters to the right of the line.
On the back piece, move the waist dart to the side seam.
The distance from the waist to the crotch should be reduced to achieve a tighter fit, especially when using material with two-way stretch. Draw and remove a horizontal strip of width 1.5 centimeters parallel to the hip line.
Additionally, you can reduce the width at the hem to ensure a better fit around the crotch and thighs. Remove a horizontal strip, parallel to the inseam, from the hem, approximately 1 centimeter wide.
To complete the redesigned pattern of the pants, redraw the lines at the waist and reshape the curves at the crotch.

By completing this article, we hope you have understood the basic principles and necessary adjustments required for creating basic patterns designed for stretch fabrics.
The different elasticity of fabrics poses unique challenges, but with the appropriate modifications, you can ensure that your clothes will have the perfect fit and functionality.
Implementing the methods we discussed will enhance the comfort and aesthetics of your creations.
Equipped with this knowledge, you're ready to move forward and create stunning elastic garments.
θέλω να φτιάξω φούστα και παρεό από ένα παλιό φόρεμα που έχω και δεν ήξερα πώς! ΕΥΧΑΡΙΣΤΩ!!!!

Μπράβο παιδιά, συνεχίστε την καλή δουλειά!

το άρθρο με το μπούστο ήταν ακριβώς αυτό που χρειαζόμουν!
nice article really usefull thanks a lot